Dreamweaver Site Configuration Files (STE)
It's hard enough to get a site configured correctly. Once it is you should save the configuration!
Site / Manage Sites / choose the site configuration you want to save and click EXPORT.
This will save a .STE file with all your settings. Save it to your keyring or G: drive
Then the next time that you come into the lab and run Dreamweaver:
Site / Manage Sites / then press IMPORT and browse to the .STE file on your pen drive or G:drive
This way you won't have to configure Dreamweaver everytime you use it.
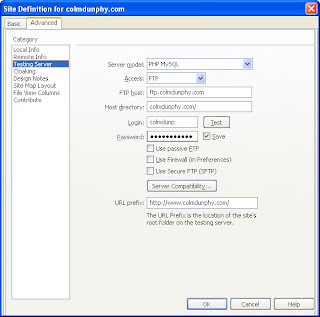
Dreamweaver - Configuration for php/MySQL using Digiweb Account
1. Local info is simple enough
2. Full FTP details to the folder where your files will be uploaded to. You will use your account username and password here
3. PHP / MySQL. rest of details are the same as step2 above.
Make sure URL prefix is correct, Dreamweaver tends to change this incorrectly to include ftp details, so you need to edit it to be your domain name
4.From the Application panel in Dreamweaver, setup your database.
You get the details for your database from the control panel for your hosted account.
i.e. when you log into your digiweb control panel, click Datatabases / MySQL DBs and it displays all the info that you need for the dialog box below.
Note that Username is one the usernames that you created with MySQL.
The password is the password for that username that you created with MySQL.
Don't confuse these with you domain username and password.
The database is the name of the database that you created with MySQL.
Connection name can't have any spaces.
The MySQL server is the hostname followed by a colon followed by the portnumber
e.g. mydomain:3306
Dreamweaver - Visual Application Generator
Most people use Dreamweaver for creating static web pages.
Some people use it for managing web sites - local files are created in Dreamweaver and FTP'd from within Dreamweaver to a remote site.
However the really cool thing about Dreamweaver is that you can use it to create dynamic websites which connect to databases without having to worry about writing code. You can choose a server model e.g. PHP, ASP, Coldfusion, etc. You can configure Dreamweaver to connect using these languages to databases like MySQL, ACCESS, SQLServer, etc.
First you must define the site
Then the application (Testing server)
Then the SQL Connection
After that it's pretty much drag and drop.
see help in Dreamweaver re-Applications
I will post example settings for the configurations in my next post
Web Databases
A good book and nice read for working with databases in web applications is called "web databases" available in the library. It also handles scripting e.g. php
Digiweb now handles RUBY!
phpAdmin v4 / v5
v4 doesn't allow you to visually create the relationships between the tables.
v5 does.
v5 is installed in the labs. Digiweb are running v4.
So, create you database locally then upload.
When you create your tables, you can select each one, click "relations view" and for each field, you can specify a table->field that it relates to.
You can also specify cascading updates and deletes from here.
NB:
if you built all this in access and use the script I mentioned in the previous post, it would handle all this for you anyway!
I want to move my MS-ACCESS database to MySQL
Get everything right in ACCESS.
create a new MODULE in ACCESS.
copy this
script and paste it into the module
make the following changes:
search for "\g" and replace it with ";"
search for "c:\temp\esql_add.txt" and change the drive letter to a drive that you can write to
search for "c:\temp\esql_del.txt" and change the drive letter to a drive that you can write to
Now place your cursor within the function
"Function exportSQL()"
and press the RUN/PLAY button on the toolbar.
This creates the 2 txt files mentioned above.
Open the esql_add.txt file and copy the contents
Then in MySQLAdmin
paste into the SQL window
Press GO
it will recreate all the tables, indicies, etc and insert all the data into the tables into your MySQL database.
Digiweb "FileManager" Vs "FTP"
If you only need to put up a few pages FileManager is the easiest way of transferring your files to the web server.
However if you want to manage your site then you will want to use an FTP client which must be configured correctly in order to work.
FTP Clients with GUIs include:
WS_FTP
CUTE_FTP
CORE_FTP
In your Digiweb Control Panel, select the FTP User option. This will give you the details that you need to specify in your FTP Client.
TIP: click on password and enter & confirm your password, then use this in your FTP Client.
I can't use my Digiweb control panel within the college!
Digiweb has been unblocked in the college.
The college insists that all web requests from browsers should go through a local proxy server (cache.wit.ie:8080).
However, not all computers have been configured to do this.
Usually we are talking about 2 browsers - Firefox and IE
Internet Explorer
If you can't get at your Digiweb control panel from IE, do the following:
Tools | Internet Options | Connections | LAN Settings
Make sure that the Proxy server is turned on and is pointing at cache.wit.ie port 8080
 Firefox
Tools | Options | Network Settings
Make sure that the Manual Proxy configuration is selected
HTTP Proxy is cache.wit.ie
port 8080

Digiweb Student Hosting - problem in D01
To manage your Digiweb account in D01, Internet Explorer works, Firefox doesn't.
A simple configuration setting will enable you to use firefox.
Firefox:
Tools-->Options-->Connection Settings-->Manual proxy configuration-->
http Proxy:
cache.wit.iePORT: 8080


